
Programming Experiments in PsychToolBox: Tips and Tricks
An introduction to PsychToolBox
PsychToolBox (Brainard, 1997) is a collection of scripts and functions written to make precise control of stimulus presentation and timing possible. When combined with a good basic understanding of Matlab programming, it's quite powerful and flexible.
There are a number of ways to learn how to program in PsychToolBox. For a general introduction, see Peter Scarfe’s excellent set of tutorials, which have well-commented and easy-to-understand demonstrations of many of the basic tasks one might want to do when using PTB for experiment presentation and stimulus delivery.
An example from the Decision Neuroscience Lab
In our lab, we have developed a number of practices, including writing general-purpose scripts and functions, that I have found make programming studies quicker and easier. This module will walk you through an example for how we set up and write a simple experiment of the kind that we do in my lab. We study decision making, so this experiment is designed to:
-
present the participant with experiment instructions and practice tasks
-
run them through a set of choice trials about whether or not to eat a food
-
collect subjective ratings about each food from the participant, for later analyses about the determinants of choice
-
select a food outcome to give the participant, based on their choices
You can download the full set of files to run this experiment here.
As we walk through the experiment setup, I will highlight recommended practices and examples of code that we have used to solve recurring challenges or problems in programming.
DISCLAIMER: there are always other (and maybe better) ways to solve these challenges! However, the approaches highlighted here illustrate certain useful principles. As you get better at programming, you may identify more elegant solutions, and we welcome and encourage you to
on these scripts.
Recommendation #1: Adopt a consistent directory structure
In general, I recommend thinking carefully about how you would like study folders to be set up and sticking with a basic structure for every single study you run. This has the advantage that any user familiar with the setup for one study can more quickly and easily find what they are looking for in another study, because they already have some idea of where to look. It also means that you can have a "template" study that you can copy as a skeleton to begin new projects. Over time, I have gravitated toward the following directory setup, though you may benefit from a different setup depending on your particular needs.

An example of this kind of setup can be seen if you download and unzip the example study.
Recommendation #2: Develop general-purpose functions
You will likely find yourself repeatedly trying to perform certain key tasks during experiment development. I have written general-purpose functions, which I use in every study, that suit my particular aesthetic about how to go about this. I store these in a folder called "PTBToolBox" and every study I write gets a copy of this folder dumped into it, inside the PTBscripts folder. Below, I list these general-purpose functions. Click on any one to be taken to a page describing in more detail the function as well as the key problem(s) it solves and how it solves them. You're welcome to use these out of the box, or you may simply want to take them as inspiration and write your own to suit your specific needs and aesthetic.
-
InitPTB.m - initial study set-up
-
collectResponse.m - log a response and RT
-
logData.m - save experiment data in real time
-
showInstruction.m - present instruction slides
-
makeTxtrFromImg.m - load image and prepare for PTB
-
findPicLoc.m - easy(ish) image sizing and placement tool
-
searchcell.m - A function for flexibly searching a cell structure to find a particular value. Often surprisingly useful, especially when doing data analysis.
Recommendation #3: Divide and conquer
Use a master script (e.g. runStudy.m) to control the flow of an experiment. Then write separate scripts/functions to divide the study into task components and trial components. Ideally, these can be run either from the master script, or independently. This is a much better approach than simply having a 1000-line program that runs the whole study. Breaking a behemoth like that into pieces makes for more readable code and easier debugging. I recommend some or all of the following divisions/dependencies:
Instructions/practice: You may prefer paper or verbal instructions, but having some standardized slides that introduce a participant to the tasks they will be doing can also be useful. I will often show the instructions, include a set of practice trials, and then implement a set of comprehension questions that I can use to gauge a participant's understanding of the task (see runInstructionTask.m for an example).
Study phases: Your experiment may consist of only one task (e.g., the Stroop task), or it might have several distinct phases or components. I like to break each of these conceptually separate phases into their own stand-alone code. In the example used here, this includes:
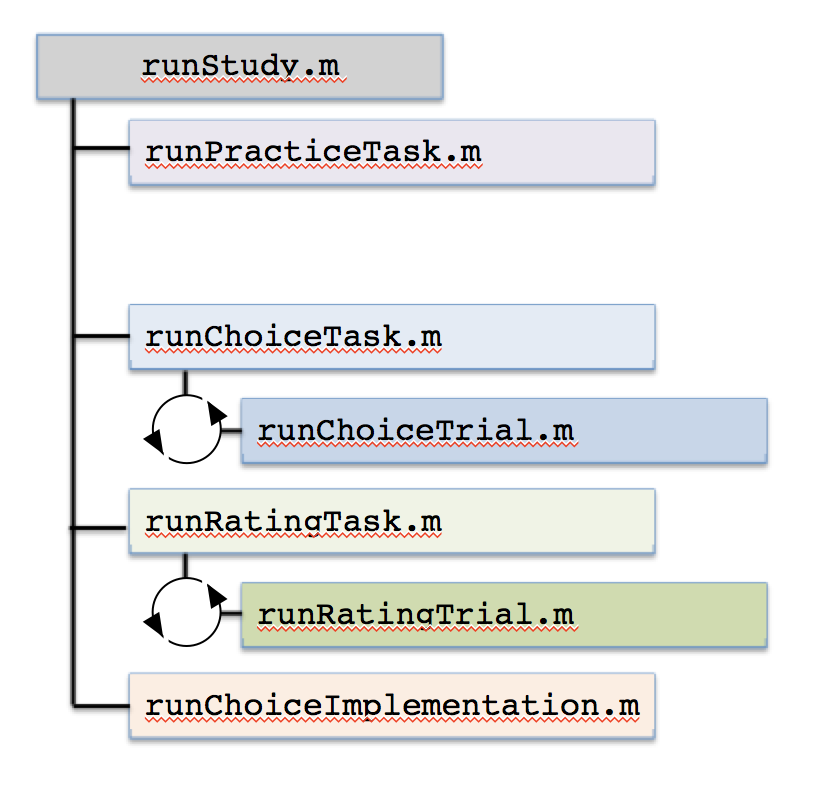
runChoiceTask.m: participants make choices about whether they would like to eat different foods, while thinking about those foods in different ways (e.g., Focus on Healthiness, Respond Naturally)
runRatingTask.m: participants view all the foods again and give subjective ratings of the food's healthiness, tastiness, and overall liking, for later use in predicting choice.
runChoiceImplementation.m: a random choice is implemented from a subset of the participant's choices
Repetitive tasks/blocks of code: Often times I find myself using a for-loop to run a series of trials in which I want to a) present a trial using a particular stimulus, b) save data about that trial, and c) perform some other miscellaneous tasks. In these cases, I often find it helpful to wrap up the trial-presentation portion of the code in a separate stand-alone function that can be edited easily. In the example here, this includes two types of trials (choice trials and rating trials) which each have their own function:
runChoiceTrial.m: presents foods and logs choice responses
runRatingTrial.m: presents foods and logs food ratings
Note that it can be helpful to name these functions in a way that identifies the level/component they implement, and links related functions. So, for example, one function can be named "runChoiceTask.m" and another function can be named "runChoiceTrial.m". The latter is called repeatedly by the former during execution.
Visually, the set of dependencies and interrelations in the current study looks like this:
Recommendation #4: Develop code that can be run in any location, on any platform
You may be a Mac person. You may be a PC person. Regardless of your personal preference, the likelihood is that, at some point, you will be writing experiment code that will be run on both platforms, and/or on different computers. This means that it is generally good practice, as much as possible, to write code that will work anywhere. There are a few key practices I have developed to do this.
Platform independence usually can be solved fully just by recognizing the most commonly encountered differences between them:
Key names on the two systems sometimes differ. For instance, on a Mac, the name for the right-arrow key is "RightArrow" while on a PC it is "right". Make sure that you program for either eventuality.
The file separator (i.e., the separator between directories or file levels in a path name) is '\' on a PC, while on the Mac it is '/'. You can either use the MATLAB function 'filesep' which will check your OS and retrieve the proper seperator, or better yet, you can use the function 'fullfile' to stitch together path name components flawlessly on any system.
Location independence means that you can dump your study directory in any location on a computer, and it will just run. To accomplish this means that in any script performing file access, we have a means to flexibly determine the appropriate path names to the file. To do this, include a few lines of code at the top of a function to get the path to the study directory:
% /specify the study directory name/ %
studyID = 'ExampleStudy';
% /Get the path to study directory for location independence/ %
% Use mfilename to retrieve the full path of the script/function where
% it is called
% Use regexp to search the path name for the study directory name,
% and then extract the full path up to that point. All files will be
% called using this home path
pathToFile = mfilename('fullpath');
homePath = pathToFile(1:(regexp(pathToFile,studyID) + length(studyID)));
addpath(fullfile(homePath, 'PTBscripts'))
addpath(fullfile(homePath, 'PTBscripts', 'PTBToolBox'))
Recommendation #5: Develop consistent debugging and testing procedures
Nothing hurts more than getting halfway through data collection, only to realize you haven’t collected a vital piece of data. Only slightly less painful is getting through your first subject or two and then having the experiment crash partway through. I recommend developing a set of practices that allow you to test various aspects of data collection and data analysis:
Knowing how to abort a study is the first step in debugging. In MATLAB, you can do this by pressing and holding Ctrl-C until the program stops running. If you have opened an on-screen PTB window, you can close it by typing 'sca' (which stands for Screen Close All) at the command prompt and hitting [Return]/[Enter].
Get comfortable breaking things. You're probably not going start an intergalactic war if you mess up your code, and experimenting is the absolute *best* way to learn how to program. Most of my programming knowledge came from saying "I wonder what happens if I...Oops! Well what about...?"
Googling for solutions to particular tasks, or for particular error messages, is often the best way to solve a particular issue. Develop sleuthing skills on how to type a Google search term that will get you the information you want.
Develop proficiency using debugging tools.
Never assume that just because code works for one trial, it will work for all trials. Always test the study multiple times with different input to find weak points. In particular, you should play the role of your own worst nightmare participant, and deliberately try to break your scripts by hitting different keys. If you can't do it, then the likelihood is that neither will your (hopefully) better-intentioned participants.
Develop “test-mode” versions of the study. Adding a few lines of code to help you run through a study from beginning to end without having to actually run through it yourself can save you a lot of time, effort, and frustration. See runChoiceTrial.m and collectResponse.m for one example of how to use test mode for study debugging
Recommendation #6: Extensive and strategic comments.
It’s easy to write code only for yourself, assuming that you will remember exactly why or how you did certain things. Turns out this is wishful thinking. Pretending you are writing code for a naïve audience is not altruistic, but it is an example of delayed gratification. You will thank yourself later!
Recommendation #7: White space right space.
There are a number of ways to make code more readable, so that you can quickly parse what is going on. Getting in the habit of using indents, spaces, and new-lines strategically to help illustrate code flow is another way of making the code readable, accessible, and understandable.
Recommendation #8: GitHub
It can be very useful to save versions of experiments, so that you can test out new additions of code without worrying about breaking things. GitHub is one of the most popular platforms for doing so. It is also useful because it can allow you to share code and branch off different versions fairly easily. Two introductory tutorials for doing this can be found here and here.
References
Brainard, D. H. (1997) The Psychophysics Toolbox, Spatial Vision 10:433-436. [PDF]